
Learn Brush Lettering + Calligraphy
In this guide, we have amassed a ton of useful resources and tips to help you get started with brush calligraphy!

1. Supplies
If you read or watch pretty much any other brush lettering tutorial on the internet, it is guaranteed that you will be recommended an array of ridiculously expensive supplies. There's nothing wrong with fancy markers or paper... but why ruin pricey lettering supplies as a beginner?
The reason most sites will advise you to purchase expensive supplies is because they are sponsored by the companies that produce them! Some lettering instructors even receive a percentage of each marker or paper pad they direct you to purchase, so of course they are biased towards these products.
If you've done any brush lettering research on social media or the internet already, you've probably heard of this ubiquitous brush pen: the Tombow ABT Dual Brush. While they may be hip, these markers are totally overrated. They do blend well and come in over one hundred bright colors, but they cost a fortune and ruin almost instantly.
Best Supplies for Beginners
Best Supplies for Experienced Letterers
As a beginner, don't invest too much in your supplies. Brush marker tips can wear down easily, and you need markers that can hold up to heavy practice and improper handling.
Markers
Top Pick: BIC Brite Liner Flex
While these markers are technically highlighters and have a very poor color selection (3 colors total), they are cheap, easily found at major retailers (Staples, Target, etc.) and have a sturdy tip that is excellent for newbies.
Top Pick: Tombow Fudenosuke Hard Tip
This is a small brush pen that is very easy to handle and universally recommended for starting calligraphers. This value set is great and also comes with the soft tip version.
Crayola Signature Series Brush Pens
This newly released set is part of Crayola's new line for adult coloring books. It includes 16 colorful dual tip brush pens with sturdy tips, plus a cute tin for storage.
You'll find that many hand lettering artists love working with the Crayola markers kids normally use! They're familiar and hard to ruin, come in lots of colors, and great for learning how to apply pressure.
Paper
Top Pick: Rhodia Dot Pad
Rhodia paper is on the expensive side, but it's a worthy investment. The paper itself is exceptionally smooth (you have to try it to believe it) and resists ink bleed and show-through. Your brush pens will last longer and look better when you practice on this paper.
Tracing Paper
Tracing paper is easy to find and also relatively smooth. It's the best alternative to Rhodia.
Printer Paper
Printer paper is fine if it's all you have. Still, strive to find a smoother and better quality variety of printer paper, such as this one.
Once you've learned how to handle brush pens and feel well enough experienced to invest in premium supplies, these are our recommendations.
Markers
Top Pick: ZIG Brushables
The greatest brush pens around. Brushables have brush tips on BOTH sides and hold up surprisingly well to heavy and long term usage. Unlike competing brands, these won't fray for a while.
Top Pick: Marvy Uchida Le Plume II
Double ended brush pens: one side is a super fine tip drawing pen, the other side is a high quality brush marker. These come in a ton of colors and can be found for a pretty decent value.
Pilot Petit3 Fountain Style Fude Pens
These are small brush pens with refillable ink cartridges! These markers are filled with colorful fountain pen ink that shows up fantastically on Rhodia paper.
The Zebra Disposable Brush Pen series is a nice alternative to the Tombow Fudenosuke selection. The medium size brush pen is a standout. These have been reportedly dug up at DAISO stores before at a cheaper price point.
Paper
Top Pick: Rhodia Dot Pad
Seriously, Rhodia paper will change the lives of you and your brush pens. Paper makes a significant difference in your brush calligraphy experience.
Maruman paper is super smooth and high quality. It's a great alternative to Rhodia. Their spiral bound basic notebooks are fantastic.

2. Getting Started
You're ready to get started with brush lettering. Your first attempt probably isn't going to look the way you want, but don't get discouraged. You're going to improve a lot as long as you keep practicing.
Preliminary Steps
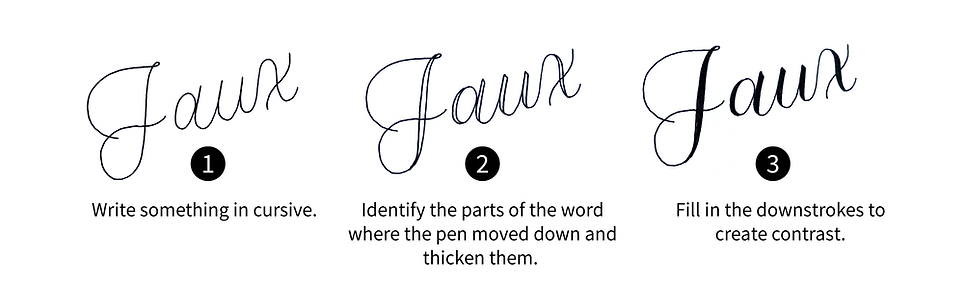
1. Familiarize Yourself with Faux Calligraphy
Faux calligraphy is an excellent place to begin your brush lettering journey. Understanding how calligraphy works is an important first step. You can create faux calligraphy with any kind of pen or marker (you could even use a pencil). Write a word in cursive, and then go back and find the downstrokes (the places where you moved your pen down toward you to create the letter). Thicken the downstrokes. This is the idea of calligraphy — creating thin upstrokes and thicker downstrokes. However, in calligraphy, you do it all in one swift motion.

2. Learn the Foundational Strokes
Foundational strokes are a starting place to learn how to alternate between a thin and thick stroke with your marker. Once you've learned to apply pressure correctly to create these strokes, you can move on to build letters.
Try writing these strokes!
The animations below show you where to start and end each stroke. The big idea here is being able to produce thin upstrokes and thick downstrokes. As you try the first two drills, change your grip on your marker and the pressure you apply until you discover the thinnest and thickest possible strokes you can create. The rest of these strokes all are about transitioning between thick and thin.
Go in order teaching yourself the 8 foundational strokes. It is particularly important that you master upstrokes and downstrokes before you move on to the rest.
Download this free printable worksheet set for Basic Strokes.
If you want a printable reference and worksheets to start from, this free worksheet set includes descriptions of how to create each foundational stroke and practice guides with space to trace and practice the strokes in free hand. The worksheets are suitable for both large and small brush pens.
3. Drill
Drilling is a way to practice. Many calligraphers drill by writing the foundational strokes over and over. There are other varieties of drills, but they all have to do with the same idea: thin upstroke, thick downstroke. Whatever drill you decide to try, the key is repetition. Keep going until the motion begins to feel natural to you.
3. Building Letters
If you know how to handle a brush pen at this point and have a grasp of the foundational strokes, then you're ready to begin building letters and practicing them.
How to Letter the Alphabet
1. Download our free printable alphabet reference guide.
This reference guide will give you a glimpse of how each letter of the alphabet is written in brush calligraphy. See how many letters are composed of the basic strokes you already know, plus get a full page of tips to improve your alphabet. Use tracing paper to trace over the letters in the guide to gain muscle memory.
2. Download our free printable lettering guidesheets.
Once you have an understanding of how each letter is constructed, it's time to practice on your own. Use these color coded guidesheets to follow along with the reference guide and keep your letters aligned and proportioned correctly.
3. Check out #LetterArchive on Instagram for more letter guidance.
Hand lettering artists and calligraphers across the world share inspiration and examples of drawing every letter of the alphabet using #LetterArchive. To find a specific letter, use #LetterArchive_a, #LetterArchive_b, etc. This is a valuable resource for letterers of all skill levels!
Repetition is always a good idea — if you don’t feel good writing a particular letter, pull out a piece of scratch paper and write it over and over again.
4. Still need help piecing together your letters?
We're planning on selling a new, comprehensive letter building practice guide in the shop soon. Stay tuned.
For now, grab some tracing paper and try tracing the alphabet reference guide a couple of times. The color changes signify where strokes begin and end, so lift your pen each time the color switches and begin a new stroke. Through tracing, you'll obtain a better understanding of how to write each letter. You might also want to go back to basics and spend more time on your foundational strokes.
Improve Through Practice
Squeeze in practice all the time throughout your day: hand letter your grocery list, cover your meeting notes with lettering drills, scribble some foundational strokes on a post-it. Remember: lettering is supposed to be fun, so don't stress about it. Enjoy the process. You're just going to keep improving.
Don't to Be Afraid to Create!
Once you start playing with a brush pen, you’ll just be itching to create something. Don’t be afraid to try, even if you haven’t fully mastered all the letters yet. There’s so much inspiration out there.
4. Techniques
Coming Soon
Learn to blend brush markers and create a ton of cool lettering effects, including outlines, shadows, ombre, and two-tone. We also plan on covering different calligraphy styles, including bounce lettering. Check back soon!
For now, practice with this free STYLIZED ALPHABET printable worksheet.
5. Resources
In case you missed any of these free printable resources mentioned throughout the guide, they're right here for you to download and use. (Personal use only.)
Share this Guide on Pinterest
Fill out this mini survey to let us know what you thought of our Learn Brush Lettering guide and offer suggestions of what else you would like to see. Your feedback will help us improve this free resource.